Flutter: The Good, Bad & Gotchas
June 18, 2019
Getting Your Sage One Company ID For API Integration
September 6, 2019
Sometimes when building an API you want to have a generic return message that all responses would conform to. Something like
{
     "status": "ok",
     "data": {
         "name": "Bob Vance",
         "age": "45",
         "hobby": "Refrigeration"
     }
}
And this is pretty easy and manageable if you only have a small amount of data, and a couple of calls. What happens when you have to have the same response for each of the CRUD operations? Sure you could define a single method in the controller and leverage the method through something like:
return $this->generateResponse('ok', $data);
I have used this approach many times and it works, but sometimes it’s just not enough.
Sometimes you would want to include a part of that response in another controller, so you could copy the generateResponse() method and make it suit your needs, and now the client comes to you and says they want the users height in the response, so you have to update each and every instance, they come back again and want something else, etc etc ad infinitum. It can and does get out of hand really fast.
This is where API Resources come in.
“Laravel's resource classes allow you to expressively and easily transform your models and model collections into JSON” - Laravel API Resources: Introductions
To generate a resource php artisan make:resource UserResource. They will by default be placed in the app/Http/Resources directory.
“A resource class represents a single model that needs to be transformed into a JSON structure.” - Laravel API Resources: Concept Overview"
Side note: I prefer naming my resources {Model}Resources, and my Resource Collections {Model}ResourceCollection, but it is perfectly alright naming the resource {Model} and the respective Collection {Model}Collection, it's a personal preference.
Let's right into the code, the above command will generate the following:
namespace App\Http\Resources;

use Illuminate\Http\Resources\Json\JsonResource;

class UserResource extends JsonResource
{
    /**
     * Transform the resource into an array.
     *
     * @param  \Illuminate\Http\Request  $request
     * @return array
     */
    public function toArray($request)
    {
        return [
             'id' => $this->id,
             'name' => $this->name,
             'age' => $this->age,
             'hobby' => $this->hobby,
             'created_at' => $this->created_at,
             'updated_at' => $this->updated_at,
        ];
    }
}
Note: I have added in the data inside the array being returned. By default it in return parent::toArray($request); which just transforms all the models data to an array.
We can get any of the model’s properties quite easily by using the $this variable. Laravel is smart enough to know what model you are trying to access and adds those properties into the resource from the referenced model.
So now we can use this resource like so:
use App\User;
use App\Http\Resources\UserResource;

return new UserResource(User::first());
And we of course get the response we want
{
    "data": {
        "id": 1,
        "name": "Bob Vance",
        "age": 45,
        "hobby": “Refrigeration”,
        "created_at": "2019-08-01T08:11:53.000000Z",
        "updated_at": "2019-08-01T08:11:53.000000Z"
    }
}
Now, we are prepared for the the client to came to us and tell use we need to add in the users weight, or height, or their best friends name. We can easily update every instance of this return by simply adding the required property into the UserResource resource.
In order to get the ”status”: “ok” part of the response we will need to use a Resource Collection.
Resource collections are just Resources but meant for a collection of resources. Pretty self-explanatory.
Notice how we used User::first() for the UserResource. If we had tried something like User::all(), we would have gotten an error.
In my case I got Property [id] does not exist on this collection instance. This is because we are trying to reference a property using the $this variable on a collection. Right now we cannot use our UserResource for more than one user.
Using the command php artisan make:resource UserResourceCollection or php artisan make:resource UserResource --collection will generate for us a Resource Collection that we can use in conjunction with our UserResource.
This part can get a little confusing, for me it makes sense as long as I keep the names of the resource the same as the name of the resource collection.
In this case I have a UserResource, so it makes sense to have a UserResourceCollection.
As I said before, this is my preferred naming convention, you can name the resources User, and UserCollection if you would like. Keep in mind if you are importing the User model, you will either have to use the User resource as something else, like UserResource, or use the User model as something else, like UserModel, to avoid clashes in your code.
Now back to the Resource Collection.
If we have a look at the file generated (again in the app/Http/Resources directory) we can see the following has been generated for us:
namespace App\Http\Resources;

use Illuminate\Http\Resources\Json\ResourceCollection;

class UserResourceCollection extends ResourceCollection
{
    /**
     * Transform the resource collection into an array.
     *
     * @param  \Illuminate\Http\Request  $request
     * @return array
     */
    public function toArray($request)
    {
        return parent::toArray($request);
    }
}
Take this as an opportunity to note that the UserResource is extending the Illuminate\Http\Resources\Json\JsonResource class, and the UserResourceCollection is extending the Illuminate\Http\Resources\Json\ResourceCollection class.
Have a look at the underlying code, I find diving into the source code is always a fascinating look at how other developers work, and how to make my own code better.
We want to now include the ”status”: ”ok” part of the response. This is done really easily by changing the toArray() method to return something like this:
public function toArray($request)
{
    return [
        'status' => 'ok',
        'data' => $this->collection,
    ];
}
And we call the UserResourceCollection like so:
use App\User;
use App\Http\Resources\UserResourceCollection;

return new UserResourceCollection(User::all());
Our response:
{
    "status": "ok",
    "data": [
        {
            "id": 1,
            "name": "Bob Vance",
            "age": 45,
            "hobby": “Refrigeration”,
            "created_at": "2019-08-01T08:11:53.000000Z",
            "updated_at": "2019-08-01T08:11:53.000000Z"
        }
    ]
}
Notice that this data property is an array, and not a single JSON object like we were getting when we were just returning the UserResource.
Let’s say you have another resource you want to include UserResource in, but you don’t want to have the status and data properties in the response. Well we can do this by simply including
'users' => UserResource::collection($this->users)
In that Resource Collection, this will take the resource, and allow us to use a collection instead of a single instance of that model.
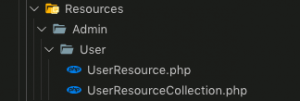
Using resources can get a little overwhelming and complicated if you are not careful. Over time I’ve learned to separate my resources by User Role, then put them into a separate folder, then have the resource and resource collection in that folder.
For instance, let’s say I want this UserResource and UserResourceCollection to be for an admin only, so my file structure would look like so:

I find it makes it a lot easier to keep track of everything.
This is the end of the first part on this blog series on Resources in Laravel.
Next part I’m going to talk about using pagination, conditional attributes, and using a resource to build up a data object to send to an API instead of just for a response.


